by Hazel Feb 25,2025
Entsperren Astro Bot's Lost Galaxy: Eine Anleitung zum Auffinden aller 10 versteckten Portale
HINWEIS: Welten mit einem wirbelnden Symbol im Level -Auswahlbildschirm enthalten ein verstecktes Portal.
Hidden Portal #1: Az-Tech Trail
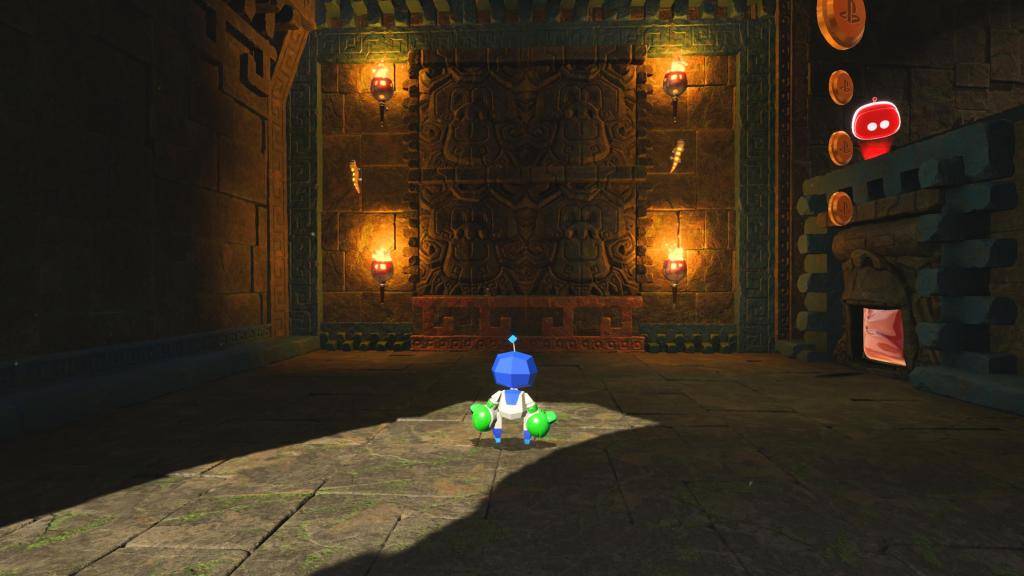
Mittelgroße Ebene einen dunklen Raum mit vier beleuchteten Fackeln, die eine Wand umgeben. Löschen Sie alle vier Fackeln mit den Twin-Freit-Handschuhen, um das Portal zu enthüllen.
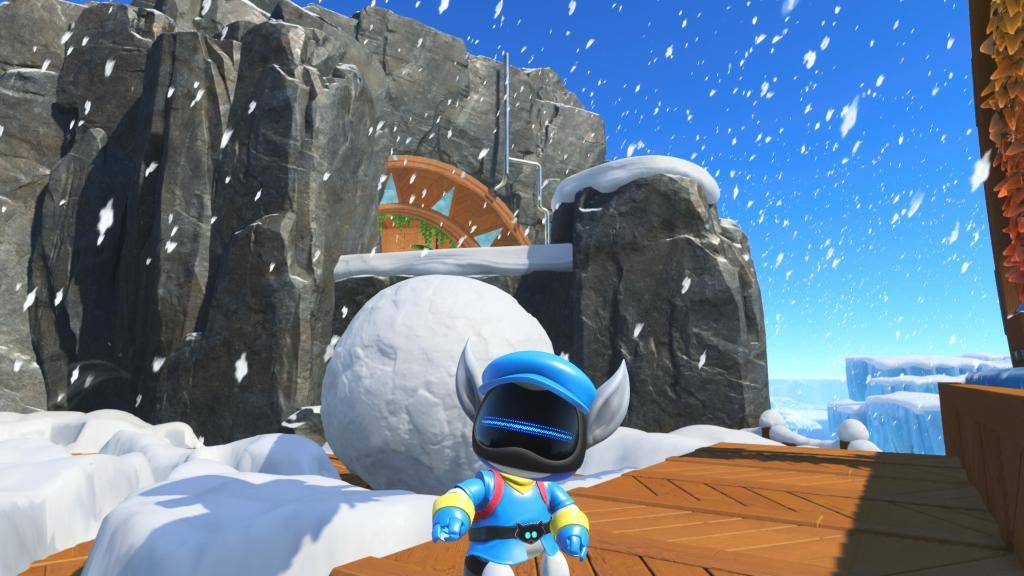
Verstecktes Portal #2: cremiger Canyon
Finden Sie zu Beginn des Levels eine schneebedeckte Gegend mit einem Marienkäferfeind. Schnapp dir das aufladende Schwein, schwing es in Richtung der eisigen Statue und lass es frei, um die Statue zu zerstören. Backtrack, springen Sie über den Marienkäfer und führen Sie einen aufgeladenen Spin -Angriff durch, um auf den versteckten Raum mit dem Portal zuzugreifen.
Hidden Portal #3: Go-Go-Archipel
Nachdem er Captain Pincher besiegt hatte, finden Sie einen leuchtenden Punkt in der Nähe seiner eingebetteten Klaue. Führen Sie einen aufgeladenen Spin -Angriff durch, um einen versteckten Raum mit Schatz und Portal aufzudecken.
Verstecktes Portal Nr. 4: Downsize Überraschung

In der Nähe des Endes des Levels finden Sie einen blasblasenden Frosch. Blasen Sie in Ihren Controller, um die Blasen zu aktivieren, schrumpfen Sie nach unten und fahren Sie mit einer Blase zu einem höheren Zweig. Navigieren Sie zum gegenüberliegenden Zweig, um das Portal zu finden.
Verstecktes Portal #5: Kostenloser Big Brother!
Drehen Sie sich bei Start des Levels um und locken Sie den elektrischen Feind, um die Plattformen zu elektrokutieren, und enthüllen das versteckte Portal.
Verstecktes Portal Nr. 6: Badehaus Kampf
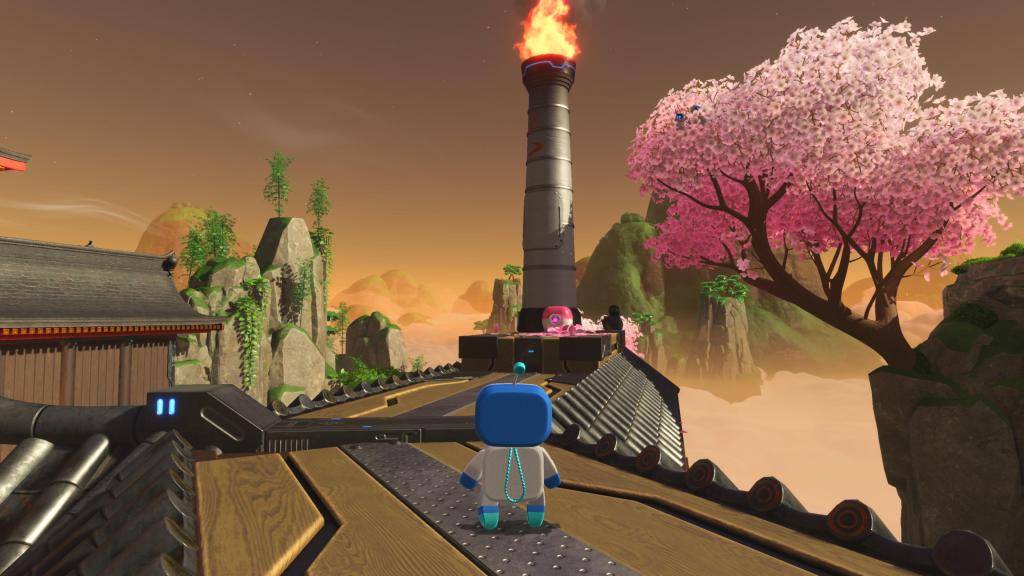
Finden Sie das Haus mit einem flammenden Schornstein. Absorbieren Sie Wasser, erreichen Sie das Dach, löschen Sie die Flammen und steigen Sie den Schornstein ab, um das Portal zu finden.
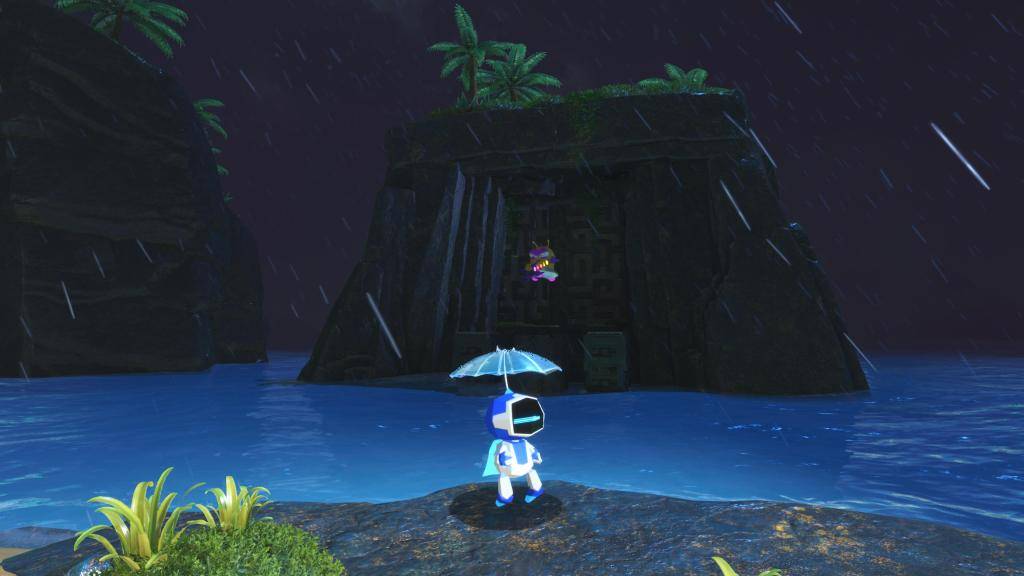
Hidden Portal #7: Hieiroglitch Pyramide
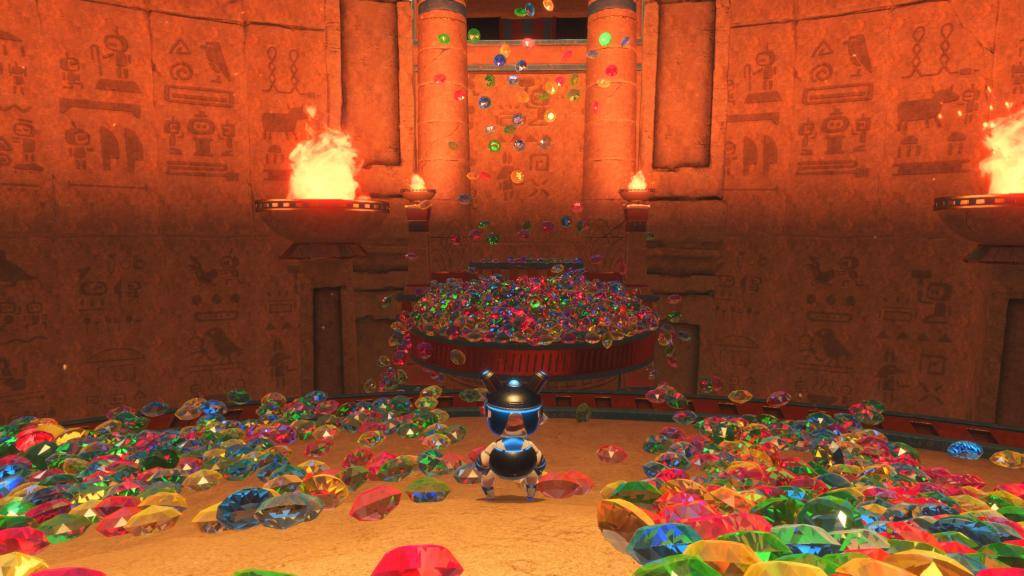
Suchen Sie am Ende des Levels ein Sprungkissen in der Nähe fallender Juwelen. Dies führt zu einer Falle; Finden Sie zwei versteckte Schalter, um den Pfad zum Portal zu öffnen.
Verstecktes Portal #8: Ballonbrise
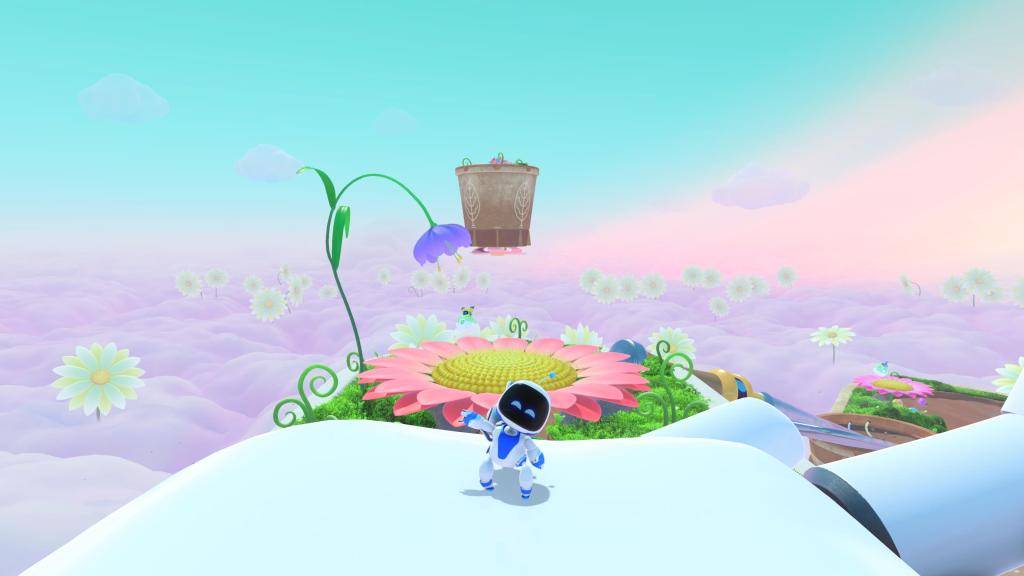
Erhalten Sie das Pufferfisch-Power-up. Verwenden Sie in der Nähe des Starts des Levels den Pufferfisch und die schwebende Fähigkeit von Astro, eine Plattform zu erreichen, und verwenden Sie dann Bewegungssteuerungen, um Bambus um das Portal umzusetzen. Aktivieren Sie es, indem Sie den Umfang umkreisen.
Hidden Portal #9: Dschinny of the Lampe
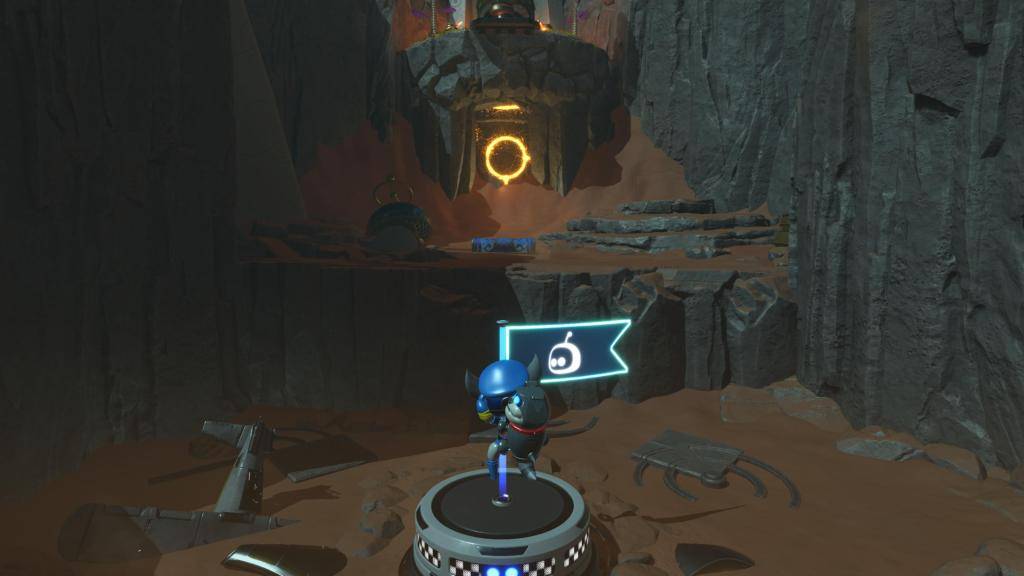
Nachdem Sie Djinny besiegt haben, klettern Sie die Ruinen mit der schwebenden Fähigkeit von Astro, unsichtbare Plattformen zu erreichen, die durch leuchtende Bodenschnitte angegeben sind. Fahren Sie mit dem Teppich zur letzten Plattform das Portal.
Verstecktes Portal #10: Gefrorenes Essen
Rollen Sie vor dem Bosskampf einen Schneeball in einen großen Ball und nutzen Sie ihn als Plattform, um die Cliffside und das letzte Portal zu erreichen.
Dadurch wird der Leitfaden abgeschlossen, um alle zehn verlorenen Galaxy -Portale in Astro Bot Rescue Mission zu finden. Viel Spaß beim Erkunden! (Weitere Führer für Trophäen und Kameen sind an anderer Stelle erhältlich.)
Astro Bot Rescue Mission ist auf PlayStation 5 erhältlich.
Zenless Zone Zero-Update-Zyklus-Leck gibt Hinweise auf zukünftige Inhaltsrhythmen
Alle Mavuika-Materialien, -Kits und -Konstellationen in Genshin Impact
Falschgeld-Banksimulator: Prägelösung für Wirtschaftskrisen
Marvel Rivals: Staffel 1 Dracula erklärt
Roblox: Anime Auras RNG -Codes (Januar 2025)
Albion Online startet das Paths to Glory-Update mit neuen Inhalten, erhöhten Spawn-Raten und mehr
Beste Xbox Game Pass Spiele für Kinder (Januar 2025)
Solo -Leveling: Globales Turnier nähert sich in der Nähe

SSM LITE-Football Manager Game
Herunterladen
Quiz Classic Console Game
Herunterladen
Who is it?
Herunterladen
Top slots
Herunterladen
Word Logic
Herunterladen
Dirt Bike Motocross MX Bikes
Herunterladen
Lucky Surprise
Herunterladen
Transport Cruise Ship Games
Herunterladen
Piano Tiles - Vocal & Love Music
HerunterladenLiam Hemsworths Geralt debütiert in neuen „Witcher“-S5-Aufnahmefotos
Mar 31,2026

"White Day: A Labyrinth Named School" is a Japanese horror visual novel and adventure game originally released in 2011 by Koei Tecmo (under the Tecmo label at the time). The game was developed by Omega Force and directed by Takashi Kikuchi, known for his work on the Fatal Frame series. The game is set in a mysterious and surreal high school that becomes a labyrinthine prison for its students after a series of strange events. The story follows a group of students who wake up to find themselves trapped in a shifting, otherworldly version of their school, where time loops, supernatural phenomena, and deadly traps abound. As the protagonist, players must explore the eerie corridors, solve puzzles, uncover hidden truths, and survive encounters with grotesque creatures known as "The White Day." The game's title refers to the "White Day" phenomenon—a fictional holiday in Japan that supposedly occurs when the school’s rules are broken, triggering a curse that traps students in a loop of fear and violence. Key features of the game include: Atmospheric horror: The game draws heavily on psychological and supernatural horror, with a haunting soundtrack and disturbing imagery. Multiple endings: Depending on choices made and which characters survive, players can unlock various endings ranging from tragic to surreal. Narrative depth: The story explores themes of isolation, trauma, guilt, and the loss of identity, with complex character backstories tied to the school’s dark past. Influences from Japanese folklore and urban legends: Elements of the game are inspired by Japanese myths, such as the "Kurokami" (Black Hair) and "The Drowned Girl," which are tied to the monsters encountered. Despite being released in 2011, "White Day: A Labyrinth Named School" has gained a cult following over the years, especially among fans of psychological horror and visual novels. It was later released internationally in English in 2013, and its full story and multiple endings have made it a favorite in the horror gaming community. Note: There has been no official "worldwide" re-release as of 2024, though the game remains available through various digital platforms (like Steam and GOG) and is often sought after by collectors and fans of the genre. If you're looking to play it, check platforms like Steam or the original PlayStation 3 release (if you own a console), but be aware that official updates or remasters are not currently in development.
Mar 31,2026

Handgezeichnetes Abenteuerspiel mit Mutanten-Soap-Opera-Stil, Mutazione, ist jetzt auch auf Android erhältlich
Mar 29,2026
Spielekonsole-Verkäufe in den USA steigen um 12 % gegenüber dem Vorjahr
Mar 28,2026

Monster Hunter Wilds – Pre-Hunt Cooking Guide (For Hunters Seeking the Perfect Edge Before the Battle) Welcome, Hunter! Before you step into the untamed lands of Aridia, Kushala Daora, and the fabled Crimson Blight, mastering the art of pre-hunt cooking is your secret weapon. Properly prepared meals give you the strength, stamina, and resistance you need to survive and triumph in the wild. This guide will walk you through: Essential pre-hunt dishes When and how to cook Best combinations for different monsters and zones Pro tips for maximizing your impact 🔥 Why Cook Before You Hunt? Unlike in the past, Monster Hunter Wilds emphasizes real-time preparation. Your cooking choices aren’t just flavor — they’re battle strategies. Boost resistance to elemental damage (fire, ice, thunder, etc.) Increase stamina regeneration or attack power Stack buffs for maximum effectiveness Survive longer in dangerous zones (like the Blighted Forest or Volcanic Wastes) ⚠️ Warning: Cooking takes time. Set up a Cooking Station (Kanaga) before heading out — it's often found near Safe Zones, Guild Camps, or Mystery Shrines. 🍲 Pre-Hunt Cooking: Must-Have Dishes 1. Tiger’s Roar Stew (Aggression +10, Attack Power +15) Ingredients: 1x Tiger's Claw (from Tiger’s Roar) 1x Blazing Fruit 1x Wild Meat (from Common Prey) Best for: Early-game hunts Fighting fast, aggressive monsters (e.g., Nergigante, Rathalos) Pro Tip: Use Rage Fruit for +5 Attack and +10 Aggression if you’re facing monsters with high defense. 2. Frostbite Broth (Cold Resistance +25, Speed +10) Ingredients: 1x Frostbite Root (Found near Glacial Caves) 1x Ice Crystal (From Ice Wyverns) 1x Cursed Mire (From Blighted Zones) Best for: Hunting Ice Wyverns, Lavos, or Zinogre in cold zones Avoiding paralysis or chill status Pro Tip: Combine with Stamina Potion for long fights in icy terrain. 3. Thundercrack Chops (Thunder Resistance +20, Attack +12, Quick Draw) Ingredients: 1x Thunderclaw (From Thunder Lancer) 1x Lightning Berry 1x Spiked Meat (From Rusted Wyverns) Best for: Fighting Zinogre, Rathalos, or Rathian Avoiding paralysis from lightning attacks Pro Tip: Add Spikefruit for +5 attack and immunity to "Stun" effects. 4. Soul of the Blight (Poison Resistance +30, HP Regen +5/sec) Ingredients: 1x Blight Vessel (Found in Crimson Blight Zones) 1x Rotting Meat (From Blight-Infected Monsters) 1x Thunderbloom (From Volcanic Zones) Best for: Long hunts in Crimson Blight zones Fighting Bazelgeuse, Kushala Daora, or Zenith Elder Dragon Pro Tip: This dish stacks with Life Potion for instant healing mid-fight. 5. Crimson Ember Salad (Fire Resistance +25, Attack +10, Speed +8) Ingredients: 1x Ember Fruit (From Fire-Infused Shrubs) 1x Scorch Meat (From Blazing Wyverns) 1x Heat Crystal (From Volcanic Wastes) Best for: Fighting Rathalos, Vaal Hazak, or Lavos Surviving in volcanic or fire-affected regions Pro Tip: Use Fireproof Armor Layer to maximize resistance. 🧠 Advanced Cooking Tactics 🔬 Buff Stacking Combine two dishes for powerful synergy: Tiger’s Roar Stew + Frostbite Broth = +20 Attack, +30 Cold Resist, +10 Speed Soul of the Blight + Thundercrack Chops = +30 Poison Resist, +20 Thunder Resist, +5 HP Regen 💡 Use tactical cooking before your first major encounter. Don’t waste time mid-battle — plan ahead. 🛠️ Cooking Station Shortcuts Tier 1 (Base Camp): 2 items max per dish Tier 3 (Guild Base): Unlock 3-dish combos and secret recipes Legendary Recipe (Hidden Shrine): "Might of the Old World" – +40 Attack, +30 Defense, +100 HP (30 min cooldown) 🔍 Hint: Look for green glowing mushrooms near ancient ruins — they’re clues to secret cookbooks. 🎯 Final Pre-Hunt Checklist ✅ Have 2–3 pre-hunt dishes ready ✅ Check weather/zone (e.g., Blight = Poison Resistance) ✅ Confirm elemental weaknesses of target monster ✅ Stock up on Meat, Fruits, and Crystals ✅ Use Stamina Elixir and Healing Herb as backup 🌟 Pro Hunter Tip “The best hunter doesn’t just beat the monster — they outthink it. And that starts in the kitchen.” Before you face the King of the Wilds, go back to your camp. Light the fire. Cook. Then return to the hunt — stronger, faster, and smarter. Now go, Hunter. The wild awaits — and it’s hungry. 🔥 Stay hungry. Stay sharp. 🔥 Monster Hunter Wilds – Cooked to Perfection, Hunted to Glory.
Mar 25,2026
 Kategorie